Vera Olkhovskaya
sew it yourself свадебное платье many girls want. But few people know how to do it. Below we will consider the issue of cutting skirts with a train and with a difference in length, which are suitable for both wedding dresses and evening dresses.
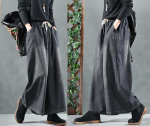
Let's start with what a loop is. It is a mistake to call a skirt with a length difference a train (photo 1 on the left). The train is the hem of the dress dragging behind, that is, the part that comes into contact with the floor or the ground (photo 1 on the right).
If we recall the times of kings, for example, the era of Louis XIV, then trains and mantles were an indispensable part of the toilet of a noble person. The train showed the retinue at what distance from their master they were allowed to follow. Of course, the longest robes and trains were worn by persons of royal blood.
Skirts with a train, like skirts with a difference in length, can be of different designs.
One of the most fashionable skirt "sun" with a difference in length, pattern which is on the website of Vera Olkhovskaya:

 Later, Tatyanka skirts with trains and less long ones ascended the fashionable Olympus. See how to cut such skirts without a pattern
Skirts made of wedges with a length difference or with a train are not widely used due to the somewhat greater laboriousness of the cutting and sewing process, as well as due to the high consumption and significant lunge area (photo 1).
Building a wedge when cutting a skirt
Let's start by building a wedge, which we will call original wedge (Fig. 1). The same wedge can be used to cut any other skirt with wedges.
Before you start building, you need learn to take measurements and learn their letters
So draw a vertical line. It will serve us as a line of symmetry of the wedge - the middle line, and on the layout it will play the role of equity for us.
Now the horizontals: the line is lii. Lay down from her
DI + 2 cm.
This extra length is recommended if the fabric is too thin, slippery or very loose.
Hip line: from the waist line down, set aside 18 см and draw a horizontal line.
Now the width of half the wedge at the waist.
The number of wedges in the considered style can be any starting from 6. If you decide on a wraparound skirt, you may need an odd number of wedges. That's why
St divided by the number of wedges
And half the width of the wedge at the level of the hips is
Sat divided by the number of wedges
The width at the bottom is arbitrary, but it is better if you first make the width the same as at the level of the hips, and then add extensions.
Figure 1 shows wedges with the most common types of extensions:
a) initial wedge - wedge base;
b) with extension a year from the level of the knee or from the level of 1/2Di;
c) with an extension from the level of the hips;
d) with an extension from the bending point of the hips, located 10 - 12 cm below the waist level.
The next operation for the design of the wedge is the deflection at the waist and bottom along 0,5 см.
The main rule in the construction of any of these wedges is the equality of length.
ДThe length measured at the shear of the wedge without flare must be equal to the length measured at the shear of the wedge with flare.
If these lengths are not equal, then the larger one is equalized by the smaller one.
Having built a wedge base for a skirt with a train or for a skirt with a length difference, multiply it to half the amount indicated by the name of the style.
That is, for a 6-blade, make three wedges, for an 8-blade - 4, etc. Do not forget to draw a line of symmetry on each part.
I will have eight-pieces. They are more convenient when cutting models with a train, as they fit well with the bodice of the dress, which has a middle seam.
Lay the wedges in such a way that their cuts along the length are end-to-end, and the cuts of the bottom form a smooth line (Fig. 2).
Extend the side of one extreme wedge by the length of the train (30 - 50 cm), and extend the line common to II and III wedges by half the length of the train.
Arrange smoothly l the bottom line, going to “no” to the first wedge.
Note that the extreme ones in Fig. 2 lines I and IV of the wedges should be connected to the bottom curve at a right angle.
Finally, extend the sides of the wedges to the new bottom line and cut each wedge with these changes in mind.
Let's look at the layout (Fig. 3). The complexity of its implementation lies in the fact that the wedges cannot be rotated relative to the line of symmetry (the middle line of the wedge) and expand or narrow.
Seam allowances - 1 - 1,5 cm, except for the waist. We do not add an allowance along the cut of the waist.
Pattern with a drop in the length of the skirt

If with a train it is performed on the basis of year wedges, then they should be laid for lengthening on a train, combining the cut points at the level of the beginning of the expansion. Beginner cutters are misled by the bend inherent in the year. In this case, the bend is not taken into account (Fig. 4) or is added after cutting to the elongated wedges.
That is, when the length of the wedges is extended and the bottom line, taking into account the plume, is verified, you just need to draw a new bend (Fig. 5). For a wedge of maximum length, the year deflection can be from 2 to 4 cm. A simple rule works here: the longer the year wedge, the greater the bend of its side.
 If it seems to you that everything is simple, then I will say right away - there is a catch. In such dresses it is very difficult to determine the position of the level of the beginning of the expansion, so as not to distort the proportions of the figure.
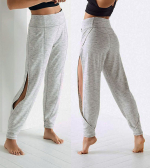
Open skirt style with a train
And one more style with a train (photo 2), which is so similar to the “Tatyanka”. We are talking about an overskirt made of an embroidered coupon "net".
Please note that such a skirt can only be cut from soft elastic mesh. Rigid and “stable” fabrics are not suitable for such a cut. Heavy guipure will not work either.
If you are not going to embroider the border yourself, then the pattern of the upper transparent skirt will look something like in fig. 6.
That is, the fabric is folded in half perpendicular to the embroidered border. From the edge of the border along the fold, the length of the skirt in front is postponed. Skirt length at the back - measured along an inclined line. The slope is arbitrary, the approximate value of the slope is 40-50 cm.
At the end, the drawing is drawn up with concave lines.
And advice. With the seeming simplicity of the cut, it is very difficult for beginner couturiers to choose the right fabric and keep the proportions of the product, so that the dress emphasizes the advantages and hides the flaws. So unless you're a professional tailor specializing in bridal and gowns, don't expect your first work to be comparable to haut couture.
Pattern of a wedding dress