Size charts What is the height of the pattern Payment methods Ask a question Reviews
 Sizes: 42 - 62
The file format of the electronic blouson pattern:
PDF in full size and without seam allowances.
After paying for the order, you will receive links to download two files pattern blouson gradation of sizes from 42 to 62:
- PDF file A4, adapted for printing patterns on sheets of A4 paper in any program on any device, including mobile phones.
- Multi-format PDF file for printing on sheets of any size from A0 to A4 on a printer or plotter using Adobe Reader.
 Sewing difficulty level: easy
The model is suitable for girls and ladies with any figure.
For sewing, you should use thick loose knitwear, jersey. Sleeves and collar can be cut out of old things. In this case, the consumption will be reduced (read the description of sewing).
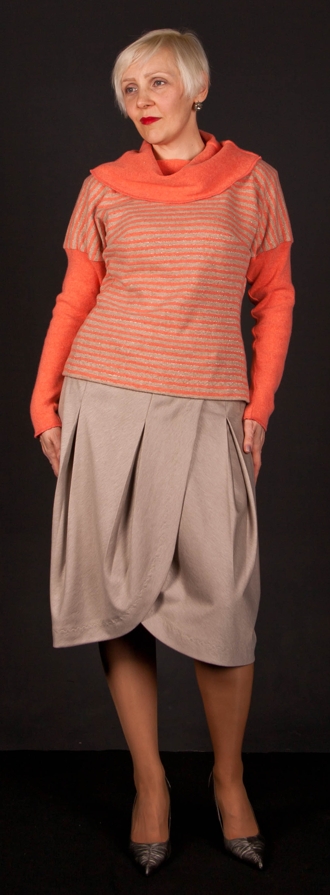
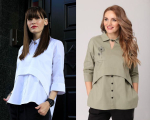
Fabric consumption from 130-140 cm. The sample shown in the photo is sewn from thick wool knitwear.
The pattern is accompanied by a detailed description of the sewing of this model with illustrations.
How to print patterns full size on A4 sheets
How to choose size without tables and measurements
Tailoring Description
 This blouson is made from a fairly thick wool jersey. As a companion fabric for the collar and sleeves, you can use a turtleneck or sweater that was in the sock.
The consumption of fabric is from 130 to 140 cm. Those who want to save money may come up with the idea that the product can also be cut across (the “front-back” part is embedded in the width of the fabric - Fig. 1). Not for all types of wool knitwear, this will be a good solution.
If the sleeves and collar are cut from old products, the consumption will be from 65 cm (for size 42) to 85 cm (for size 62). If you will cut everything from one fabric, do not forget to add two sleeve widths when calculating.
Now let's look at the traditional approach to cutting: a shared thread along the center line of the part (Fig. 2). The fabric is folded in half, the edges are aligned and parallel to the edge of the cutting table. As you can see, this layout is beneficial if all the details are cut out from the same fabric.
 In any case, the parts are cut out with an allowance of 3-4 cm along the bottom of the shelf and back. cut off by an overlock during processing). The tuck allowance for the chest looks unusual: the “house” only reaches the notches. In the large drawing, the notches are indicated by a break in the lines, in all small drawings, by green crosses. Notch length - 0,5 cm.
If desired or necessary (if the knitwear does not hold its shape), darts can be added (Fig. 3).
Shelf pullout. On the tuck for the chest from the notch (green cross), measure 4 cm and from the resulting point down - another 4 cm. The second “four” is the top of the tuck. Down (toward the bottom of the product) draw a vertical line from it, not reaching the bottom of the product 3 cm. The tuck solution at waist level is 2 - 2,5 cm, the lower top is indented to the side seam 1 cm.
Back tuck. Measure 3 cm upwards from the axillary angle and draw a horizontal line across the entire width of the back. Divide this segment in half. The point of its division is the top of the back tuck. Draw a vertical line from the top down, not reaching the bottom of the product by 5 cm. The solution of the tuck at the waist is 3-4 cm, the lower part is rejected to the side by 1 cm.
 Product tailoring.
For sewing, it is better to use a knitted seam (see the article "Machine seams").
We start by sewing the collar, the lower part of the sleeve and the middle seam of the back (for ease of processing, the middle seam can be extended to the sprout or not done at all). Seam allowances are ironed. The bottom of the sleeve and the departure of the collar are also processed with a knitted seam and the cut remains open (does not fold).
Then, if darts for the waist are provided, stitch the darts and iron their allowances to the middle seam of the back. Darts are ground in a small zigzag. The tuck for the chest is ground down later.
We turn to the processing of the side seams. Please note: the axillary angle of the back (in Fig. 20 it is indicated by small scissors) must be cut exactly to the top of the angle - not higher and not lower, otherwise the blouson will be impossible to assemble).
So, having stitched the side seams, stitch the “one” segments and the “two” segments. On fig. 20 are marked with red numbers.
Iron all stitched seams and sew a tuck for the bust in a zigzag.
Hem the bottom with a stitching (flat) seam. If there is no seaming, the bottom can be worked into an open-cut hem with a goat stitch or other elastic decorative stitch.
Assembly should be performed along the bottom of the one-piece sleeve; it is better not to assemble it in the area at hand.
In conclusion, we sew the lower part of the sleeve to the one-piece sleeve, weave in and sew in the collar.
Download this pattern pdf:
Knitted blouson pattern
$1.50 (60 hryvnia)
Bank cards of the Russian Federation are not accepted for payment!
Size charts What is the height of the pattern Payment methods Ask a question Reviews
Vera Olkhovskaya in social networks:

See similar clothing patterns and how to sew on them


-
Any pattern for free for a review of a previously made order
More...
Lifetime promotion for buyers of patterns!

Leave a review about my store of patterns for an order that you made before, and you will receive any paid pattern of your choice Free!
Catalog:
New patterns on the site


Most readable articles
- How to print patterns in full size on sheets of any format? Category: F.A.Q.
- Pattern of a dress for a babydoll girl Category: Dress patterns for free
- How to take measurements for sewing Category: Sewing: general questions
- How to sew a skirt without darts and without a pattern: "Tatyanka" Category: How to sew...?
- How to learn to sew from scratch at home for free? Category: F.A.Q.
- Skirt with a belt - how to sew a belt to a skirt and processing the belt when sewing a skirt for beginners Category: Waist section processing with and without belt
- How to choose a pattern size? Do Olkhovskaya patterns require a fit? Category: F.A.Q.
- Do-it-yourself parsley, Cossack and Gnome according to free patterns by Vera Olkhovskaya Category: How to sew a New Year's costume and costumes for the holidays with your own hands
New lessons and reviews
-
I sewed a boho trapeze dress size 42 according to your pattern
Category: Patterns - photos and reviews from users

-
I made two dresses with this pattern.
Category: Patterns - photos and reviews from users

-
Thanks for the fast order processing.
Category: Patterns - photos and reviews from users

-
When sewing, I slightly deepened the front neck
Category: Patterns - photos and reviews from users
