Size charts What is the height of the pattern Payment methods Ask a question Reviews
dimensions from 42 to 64 printed from one pattern file. Electronic sweatshirt pattern for printing in full size on a home printer or plotter. Can be printed on standard sheets of A4 to A0 paper. Paperless cutting through the projector is possible.
Free download Instructions on how to sew a sweatshirt on this pattern...
How to sew a kimono sleeve sweatshirt with a simple pattern for beginners
Contents of the instruction:
- Description of the sweatshirt pattern and assembly diagram when printed on A4.
- What is included in the kit is the pattern and the design of the style of the sweatshirt.
- What to sew, fabric consumption, general instructions.
- How to cut a kimono sweatshirt according to a simple ready-made pattern.
- How to sew a sweatshirt - sweatshirt at home - sequence.
Buy and download this sweatshirt pattern
1. Description of the sweatshirt pattern and assembly diagram when printed on A4
1.1. Description of the pattern
Sizes from 42 to 64 are printed from one pattern file.

File format: PDF full size and without seam allowances
After paying for the order, you will receive links to download two files patterns of a sweatshirt with a kimono sleeve, gradation of sizes from 42 to 64:
- PDF file A4, adapted for printing patterns on sheets of A4 paper in any program on any device, including mobile phones.
- Multi-format PDF file for printing on sheets of any size from A0 to A4 on a printer or plotter using Adobe Reader.
1.2. Pattern assembly diagram when printing on A4 sheets of a home printer

 The pattern is assembled on two large pages of patterns from 36 sheets of A4 paper:
- The first page of patterns - 20 A4 sheets, 5 rows of 4 sheets in a row.
- The second page of patterns - 16 sheets, 4 rows of 4 sheets in a row.
The sewing difficulty level is simple - novice home couturiers can make a fake pocket if this operation seems difficult.
The style of the kimono sweatshirt is suitable for all types of figures of various fullness and height.
The pattern is designed for sewing at home on household sewing machines.
For high-quality sewing, you will need a modern household overlock for knitted seam and a modern household machine with a zigzag, adjustable in width.
The stitcher can be replaced with a double needle.
2. What is included in the kit patterns and the design of the style of the sweatshirt
2.1. A set of patterns for a simple sweatshirt with a kimono sleeve
- Shelf.
- Back.
- Sleeve.
- Patch pocket.
- Welt pocket details: valance burlap, facing burlap and marking template.
2.2. Description of the design of the sweatshirt - sweatshirts with kimono sleeves
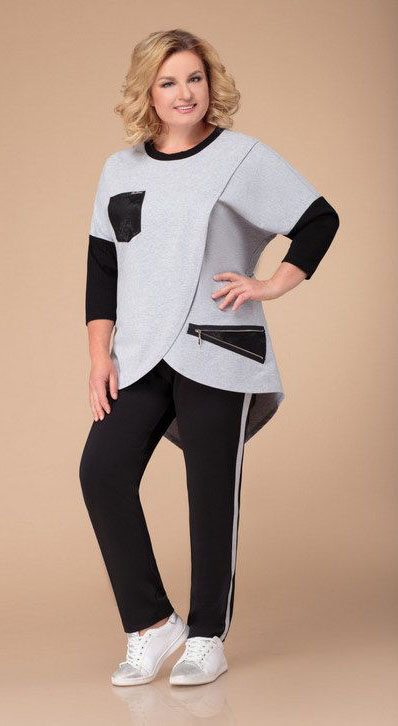
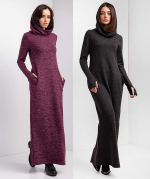
 The sweatshirt is designed on the basis of a one-piece kimono-type sleeve.
The silhouette is free - this is an oversized product.
The cut is symmetrical.
Pockets - patch and welt.
Please note that the welt pocket in the photo is a snag, and in the set of patterns it is designed like a real pocket.
The marking of the welt pocket is located so that the burlap will not peek out from under the product and nothing will prevent you from making two mirrored pockets.
3. What to sew, fabric consumption, general instructions
3.1. What to sew and how to calculate fabric consumption
You can cut from almost any fabric that has some elasticity, however, some fabrics can change the name of the product to a blouse or tunic.
To get exactly a pseudo-sport style sweatshirt or sweatshirt, you will need a footer or cooler jersey.
You can also use regular jersey with medium stretch and medium density.
The sleeve, which is cut according to the “sleeve” detail, and the pockets can be cut from a companion fabric. Or the sleeve can be cut from a thin cuff fabric in a contrasting color.
The total consumption of fabric with a width of 140 cm will be from 170 to 190 cm.
And the total consumption of the footer, which is 180 wide - from 160 to 170 cm.
Cuff fabric, at least, will be needed for processing the neck - this is 5 - 7 cm.
3.2. Instructions on how to buy, how to print and others
How to choose a size without using tables and taking measurements
What height are the patterns for?
How to buy a ready-made electronic pattern
How to print a pattern at home in full size on A4 sheets or on sheets of any other size
How to assemble a pattern after printing
Simple patterns for dresses, sweatshirts, skirts and trousers in full size Free
 Buy and download this sweatshirt pattern
4. How to cut a kimono sweatshirt according to a simple ready-made pattern
 Cutting is not difficult - seam allowances are only required for a patch pocket if it will be processed in the usual way (picture 2).
For a patch pocket in this case, you will need 2,5 - 3 cm along the cut of the entrance to the pocket and 1,5 - 2 cm to the rest of the cuts.
Shared direction of the shelf and back along the midlines.
Half skid is the middle line of the shelf.
Lobar sleeves - along the midline or perpendicular to the bottom.
Shared pocket of the invoice - along the part.
Shared burlap - a gap along the upper cut of the part, and for burlap-turning - along the entrance to the pocket.
Remember that pockets may or may not be paired. On the 1 drawing - 2 inscriptions correspond to unpaired pockets.
If you cut decorative snags, instead of real pockets, then the allowances depend on how the snags are processed.
We finish cutting by applying notches to the details of the cut.
First, we put all four side seams together and make a notch at the waist - this will be the reference point when processing the side seams.
Then, we perform notches along the middle lines on the neck, on the sprout and along the bottom.
Now about cutting parts from cuff fabric.
From the cuff we cut a strip for processing the neck and we can cut out another sleeve if the cuff is thin enough, since in this case, the sleeve will turn out to be double with a fold along the bottom.
The cuff sleeve should be narrower than the armhole so that it fits the arm quite tightly. The strip for processing the neck is shorter than the neck.
The width of the strip for processing the neckline in the cut = two widths in the finished form + 1,5 cm.
Immediately after cutting, do not forget to mark the half-skid on the shelves with a thread of a contrasting color and mark the pockets.
5. How to sew a sweatshirt - sweatshirt at home - sequence
 Let's start by explaining how to process a welt pocket (picture 3).
For beginners and not very experienced couturiers, it is recommended to first perform a training pocket on a piece of fabric before starting to sew the product.
If there are two pockets, then each item is repeated for the second pocket, and only then can you move on to the next one.
- To mark the pocket on the template, we cut a hole in the shape of the pocket, cutting off the pocket line by 0,1 - 0,2 cm so that the marking is very accurate or using a marking template. After marking the quadrangle, we extend its sides by 5 - 7 cm.
- Welt pockets marked in this way can be processed further. Dubbing can be placed under the pocket or glued from the inside, but it must be consistent with the properties of the fabric.
- Attaching details. Put on the front side of the shelf a burlap-valance and a burlap-facing with notches on the markup. Details of burlap are superimposed inside out. They should be stitched in a narrow zigzag, starting and ending with a bartack. You need to check the strength and quality of the lines from the inside of the product. If there are two pockets, then do not forget to check their symmetry.
- Cut the pocket according to the scheme, without cutting to the corners of the quadrangle 0,1 - 0,2 mm (depending on the fabric).
- Turn the pocket inside out, baste along the contour of the quadrangle and iron.
- Run vertical reinforcement stitches. It is important to know which side to take. The shelf is face up. Holding the pocket with your left hand, bend the shelf along the backtack line. You will see a corner that needs to be fixed, the corner lies on the burlap of the pocket. Sew a backstitch.
- After that, you can “cover” the pocket with an unzipped zipper, as in the photo.
- Finishing processing, grind and overcast burlap on an overlock. You can pre-stitch it with a narrow zigzag.
Now the general sequence of sewing a sweatshirt is a sweatshirt.
- Process pockets.
- Stitch the side seams on the overlocker, iron.
- Process the bottom of the product - fold it once and stitch with a double needle or other suitable seam.
- Fold both shelves, aligning the half-skid lines and the cuts of the neck. Right shelf top. Fasten them temporarily with oblique hand stitches (up to 5 cm long) or sweep on a typewriter with a “rare” line.
- Stitch one shoulder seams on an overlock, placing the edge of a thin cooler under them, or duplicating them with a narrow (1 - 1,5 cm) strip of thin knitted dublerin.
- Process the “turn” strip for the neck (hereinafter, for convenience, we will call it a turn) - iron along; stitch into a ring, ironing the seam. Please note that the facing part should be 20 - 25% shorter than the length of the neck.
- Stitch the neckline on the overlocker, evenly distributing it along the neckline. Iron the seam and secure it with a double seam (double needle). It can be fixed only along the sprout (along the neck of the back).
- Prepare the sleeves - process the bottom and stitch the seam on the overlock (in any sequence, as you like). If you have double sleeves made of thin cuff fabric, then process them in the same way as the neckline.
- Sew on the sleeves, distributing them evenly along the bottom of the kimono.
- Finishing ironing.
Download this pattern pdf:
A simple pattern for beginners sweatshirt with a kimono sleeve
$2.00 (80 hryvnia)
Bank cards of the Russian Federation are not accepted for payment!
Size charts What is the height of the pattern Payment methods Ask a question Reviews
Vera Olkhovskaya in social networks:

See similar clothing patterns and how to sew on them


-
Any pattern for free for a review of a previously made order
More...
Lifetime promotion for buyers of patterns!

Leave a review about my store of patterns for an order that you made before, and you will receive any paid pattern of your choice Free!
Catalog:
New patterns on the site


Most readable articles
- How to print patterns in full size on sheets of any format? Category: F.A.Q.
- Pattern of a dress for a babydoll girl Category: Dress patterns for free
- How to take measurements for sewing Category: Sewing: general questions
- How to sew a skirt without darts and without a pattern: "Tatyanka" Category: How to sew...?
- How to learn to sew from scratch at home for free? Category: F.A.Q.
- Skirt with a belt - how to sew a belt to a skirt and processing the belt when sewing a skirt for beginners Category: Waist section processing with and without belt
- How to choose a pattern size? Do Olkhovskaya patterns require a fit? Category: F.A.Q.
- Do-it-yourself parsley, Cossack and Gnome according to free patterns by Vera Olkhovskaya Category: How to sew a New Year's costume and costumes for the holidays with your own hands
New lessons and reviews
-
I sewed a boho trapeze dress size 42 according to your pattern
Category: Patterns - photos and reviews from users

-
I made two dresses with this pattern.
Category: Patterns - photos and reviews from users

-
Thanks for the fast order processing.
Category: Patterns - photos and reviews from users

-
When sewing, I slightly deepened the front neck
Category: Patterns - photos and reviews from users
