 For cutting complex curtains, covers for large furniture, as well as for very large skirts, you can use the technique reverse scaling patterns. The pattern (base and modeling) is made with the help of a tailor's scale ruler in a reduced form and enlarged on the fabric in real size.
This method saves not only the time and effort of the cutter, but also allows you to do without the manufacture of patterns and very accurately calculate the consumption of fabric, which in these cases is very significant.
Sewing curtains for a doorway
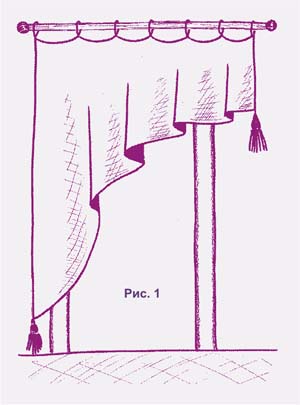
Д This style (Fig. 1) can be sewn from any type of fabric: from heavy tapestry to "gas". To build a pattern, measure the width and height of the future product in full size. Height is measured on both sides: high height, low height (Fig. 2a). We make a drawing on A4-A3 paper using a scale or regular ruler strictly in size. In the first case, 1 cm in the drawing is equal to? cm, in the second - 1 cm is equal to 1 mm. The finished small pattern is cut under the tails from the bottom up. The petals are moved apart to the desired width (spreading options in Fig. 2 b, c, d), circled on a new sheet of paper and the resulting pattern outline is enclosed in a rectangle.
Option One (Fig. 2 b) - small extension - suitable for heavy dense fabrics. According to the finished drawing, measurements are made of the width and height of the rectangle in which the curtain figure is enclosed (Fig. 3 a). All measurement results are carried out further in random order and are recorded directly on the drawing in place of the numbers.
Let's take a closer look at the measurements of the drawing. To increase it directly on the fabric, we need the width (1) and height (2) of the notch in the upper left corner; low-height cut slope (3) curtains, as well as several points of the slope cut curve. To find the latter, divide the right vertical of the rectangle into which the curtain is inscribed into four parts and draw horizontal lines from the obtained points to the cut of the curtain. Measure the length of these contour lines (4, 5, 6) and write them down.
 Enlarging a pattern is very easy. Draw the original rectangle on the fabric in full size according to the dimensions in the drawing and transfer all dimensions to it.
Please note that the drawing for one asymmetrical curtain should be mirrored to the sketch or on the right side of the fabric.
Note: a weight must be attached to the "tail" of the finished curtain. They can serve as a massive brush.
Option two (Fig. 2 c - 3 b) - more measurements will be needed, but the principle is the same.
The third option (Fig. 2d - 3c) - for thin fabrics - is the easiest to use.
Processing: edging the oblique cut, vertical sections can be processed into a hem with an open or closed cut and “covered” with a cord that turns into tassels, the top is processed with a narrow braid for curtains or edged without subsequent assembly.
Symmetrical curtain for a window or doorway - how to cut and sew

 If you use this model for a doorway, you will have to greatly lengthen the "tails" on the sides (Fig. 4). The top of the curtain is processed with velcro (Velcro braid), more precisely with its felt part, and a part with hooks is attached to the cornice using a furniture stapler.
Having measured the desired width, large height and small height of the product, make a drawing of a half of the curtain on a scale of 1:4 (using a tailor's ruler) or 1:10 (Fig. 5 a) and cut the pattern (Fig. 5 b).
Move the petals apart (Fig. 5 c), so that the sides of the large height and the small height are at right angles and, circling the pattern on a new sheet of paper, enclose it in a rectangle (Fig. 6)
pos After measuring the width and height, measure the width and height of the notch in the upper right corner, enclosing it also in a rectangle for convenience. Then - measurement of the bisector and points of the curve.
For a description of magnification, see the previous example.
Large size skirt patterns ready to print


How to cut and sew curtains for a bedroom or living room (Fig. 7).
A drawing on a scale of 1:4 or 1:10 is made exactly according to the measurements of the future product in full size (Fig. 8). You should measure the height of the product, the width (for the drawing we use half  width, as we will sew two symmetrical curtains) and the distance to the floor.
When the small drawing is ready, the “pink” fragment is cut and its “petals” are moved apart (Fig. 8) and outlined on a new sheet of paper.
Then, each fragment of the drawing is enclosed in a rectangle and measurements are taken for the subsequent increase in details directly on the fabric (Fig. 9).
It is more convenient to enlarge each part separately, that is, first a rectangle of the “upper” part is drawn on the fabric and a pattern fits into it, then, based on the layout (Fig. 10), a rectangle of the flared part is drawn  and the drawing is completed according to the available dimensions.


