Size charts What is the height of the pattern Payment methods Ask a question Reviews
 Electronic blouse pattern for printing in full size on a printer or plotter. Can be printed on standard sheets of paper from A4 to A0. Paperless cutting through the projector is possible.
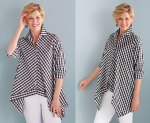
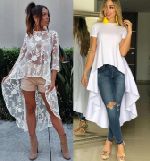
In the photo, look at the version of the blouse-shirt sewn according to this pattern by the customer Vera Secretareva.
 Download free instructions for PDF pattern of this shirt blouse...
 Buy and download this blouse pattern
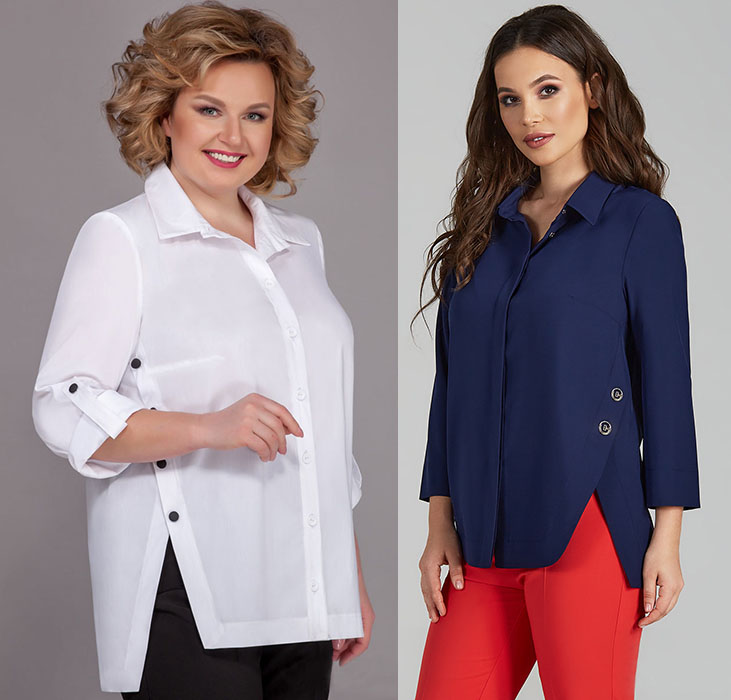
How to sew a blouse with your own hands - a women's shirt with offset side seams according to a simple pattern for beginners

Contents of the instruction:
- Description of patterns.
- The design of the style of the blouse - shirts, a set of PDF patterns and what to sew.
- How to buy, download and print a pattern on a printer or plotter.
- How to cut a blouse - a women's shirt in large and small sizes.
- How to sew a blouse - a shirt with your own hands step by step.
Buy and download this blouse pattern - women's shirt
1. Description of the electronic pattern
 A simple pattern of a shirt blouse with offset side seams
Sizes: 40-52 and 52-64.
File format: PDF full size and without seam allowances
After paying for the order, you will receive links to download two files blouse patterns - shirts with an offset side seam from 40 to 52 or from 52 to 64 sizes:
- PDF file A4, adapted for printing patterns on sheets of A4 paper in any program on any device, including mobile phones.
- Multi-format PDF file for printing on sheets of any size from A0 to A4 on a printer or plotter using Adobe Reader.
 1.1. Assembly diagram of a blouse pattern on A4 sheets for sizes from 40 to 52

Pattern 40 - 52 is going on one large page of 25 sheets of A4 paper: 5 rows of 5 sheets in a row.
1.2. Assembly diagram of a blouse pattern on A4 sheets for sizes from 52 to 64
Pattern 52 - 64 is going on one large page of 30 sheets of A4 paper: 6 rows of 5 sheets in a row.
 Sewing Difficulty Level: Easy, but you will need skills to process sleeve vents, cuffs and collars.
The style is suitable for both full and slim.
The pattern is intended for home use only and for sewing on household sewing equipment.
For tailoring, you need a household machine and a household iron. You can do without an overlock.
2. The design of the style of the blouse - shirts, a set of PDF patterns and what to sew
2.1. A set of patterns for a simple loose blouse - a shirt with an offset side seam (picture 1)
- Back - back yoke and back (large lower part with a soft pleat).
- Shelf.
- Pickup.
- Non-stop sleeve with length markings for long, short and 3/4 sleeves. On the pattern of the sleeve, the attachment point of the strap and button is also marked.
- Collar on the stand "shirt".
- Strap.
 Cuffs are not included as they are rectangles. Below is how to calculate the cuff size.
2.2. Description of the design of the blouse pattern - shirt
The silhouette of the model is free.
The side seam is displaced due to the expansion of the back.
The set of patterns is supplemented with a selection detail.
Non-stop sleeve, shirt collar on a one-piece stand.
2.3. From what to sew a blouse - a shirt of a free silhouette
A blouse - a shirt can be sewn, both from cotton or linen, and from silk fabric.
Shirt fabric, fine linen, poplin, batiste, and any thin enough silk will work for this blouse.
Please note that both double-sided shirt fabrics and printed single-sided dress fabrics can be used. About the features of cutting from different fabrics, see below.
The consumption of fabric for a blouse - shirt with long sleeves will be from 140 to 190 cm. The preferred fabric width is 150 cm.
3. How to buy, download and print a pattern on a printer or plotter
How to choose a size without using tables and taking measurements
What height are the patterns for?
How to buy a ready-made electronic pattern
How to print a pattern at home in full size on A4 sheets or on sheets of any other size
How to assemble a pattern after printing
Simple patterns for dresses, sweatshirts, skirts and trousers in full size Free

Buy and download this blouse pattern - women's shirt
4. How to cut a blouse - a women's shirt in large and small sizes
Consider various options for cutting a blouse made of double-sided and one-sided fabrics, which differ only in the clasp (picture 2).
When cutting and sewing blouses from double-sided thin shirting fabrics, cambric, gauze or thin silk, it is customary to simplify the processing of the fastener by imitation of the strap. The board is processed by a double hem (figure 2 a).
") The width of the selection that imitates the bar is 2,5 - 3 cm, and the width of the first hem is 1 cm. If you need an imitation of the bar, then we hem the hem to the front side of the shelf, and if you only need a selection, we fold it inside out, like the bottom in a dress.
The width of the selection that imitates the bar is 2,5 - 3 cm, and the width of the first hem is 1 cm. If you need an imitation of the bar, then we hem the hem to the front side of the shelf, and if you only need a selection, we fold it inside out, like the bottom in a dress.
For a hidden fastener, we cut the left shelf with a side, as for a strap (figure 2 a), but the right shelf is slightly different (Fig. 2b). In fact, for a hidden fastener, a fold is needed in which the loops will hide. So, for the inside of the fastener we add 5 - 5,5 cm, for the visible part of the side - 2,7 - 3 cm and for the hem 1 - 1,2 cm.
Please note that the concealed closure is only suitable for thin and very thin fabrics.
For thicker or denser fabrics, a regular pick is better (figures 2c and 2d). The pick-up is also ideal for single-sided fabrics, such as printed silk.
Please note that the selection can be as one-piece (figure 2c), and as a separate part (figure 2d). Of course, a one-piece selection is preferable, as it saves processing time and improves its quality. The catch is that when cutting large sizes, a one-piece selection will greatly increase fabric consumption, since additional stitching in the selection of a blouse is undesirable.
4.1. seam allowance (picture 3)
As you know, the traditional allowance is 1 cm. For this model, 1 cm is added only along the shoulder sections, along the yoke sections, along the front and back sections of the sleeve and in the upper part of the side seam of the shelf above the tuck. And also when cutting the collar and strap, but we'll talk about small details later.
 We do not add allowances for seams along the armholes, collar and neck. No allowance is needed for the take-off cut of the selection.
On the bottom of the blouse and along the offset side seam - 3 - 3,5 cm. Keep in mind that we will process the bottom and side seams in a hem with a closed cut (double hem).
4.2. Cutting small details on a blouse pattern
For a strap, it is enough to cut a strip of fabric of the desired length.
Width of the strip in cutting = twice the width of the finished tab + 2 cm
For cuffs, the calculations are as follows:
Cuff width in cutting = width in finished form + 2 cm for processing
Cuff length in cutting = Wrist girth + 4 cm + 2 cm for processing
If a split sleeve slot is required, then it can be marked by stepping back from the back cut of the sleeve 1/4 of its width along the bottom. The length of the slots is on average 10 cm.
As for the collar, it is recommended to cut it after the shoulder seams and sides are processed, so that the length of the neck of the product is precisely known.
But when cutting large parts, it is better to “book” the place for cutting the upper and lower collars.
4.3. The sequence of cutting the collar for a women's blouse - shirt:
- We cut out dubbing for the lower collar without seam allowances. It can be both adhesive interlining and dublerin. If you want to use a collar fabric, then dubbing the rack can be cut out of a softer duplicating material. In any case, we cut out the dubbing without seam allowances and cut it along the line of the rack.
- Dubbing, cut without seam allowances and cut along the line of the rack, is glued to the fabric. The distance between the dubbing of the stand and the dubbing of the flying part should be 0,2 cm. This is necessary so that the flying off is easily bent and the stand does not lose its shape.
- We cut out a collar with 0,8 cm seam allowances. This is the lower collar.
- We cut out the upper collar according to the workpiece of the lower collar, adding another 0,2 allowance. This method of adding allowance will allow you to achieve the necessary fit of the upper collar.
Another important question is how many coquettes do you need - one or two? When sewing from thin fabrics, such as cambric or gauze, the answer is unequivocal - two is better than one. If the fabric is dense, then you can get by with one yoke.
An example layout is shown in 3 drawing.
After cutting, we perform notches along the half-skid, the edge of the side on the cuts of the neck and the bottom of the shelf. On the cut of the yoke stitching on the back, we make a notch that marks the fold.
5. How to sew a blouse - a shirt with your own hands step by step
- We grind and iron the tuck, iron the pick.
- Overcasting or edging the departure cut of the selection. We iron.
- We lay, sweep and iron the soft warehouse on the back.
- We process the shoulder seams and the seam of the back yoke. For this, if the coquette is single, a double or a sewing seam is suitable. If the yoke is double, then the open sections should be between the yokes. We iron the seams.
- We grind the strap, iron it and stitch it with a finishing line.
- We sew a strap to the sleeve, if provided.
- We iron and sweep the “lateral” (shifted) cut of the shelf and the bottom. First, iron by 1 cm, then, fold and iron to the remaining width of the hem.
- We proceed to the processing of the "lateral" (shifted) cut of the back and bottom of the back. We bend and iron 1 cm. We bend the upper part of the “side” seam, which is higher than the protruding corner, by another 1 cm. And we bend the lower part of the “side” seam and the bottom a second time to the line that is marked on the cut.
- The upper part of the “side” seam of the back, which is above the protruding corner, can be immediately fastened with a stitch and ironed. Then we put a shelf on the treated area - the corresponding area is bent, but not processed. Let's brush it off. We decide how best to process it - along the edge, indented, what line will be (regular or finishing). After that, you can sweep and topstitch the entire bottom and side seam using decorative stitches.
- We stitch the sleeve. It can be done without stitching, evenly distributing the sleeve along the armhole. The concave part of the okat - to the shelf, the convex - to the back. The highest point of the eye (in the middle of the eye) - to the shoulder seam. It is not necessary to achieve the coincidence of the sleeve and side seam.
- We process the cuffs - we grind along the edges, iron them.
- We process the slot and distribute the folds - arbitrarily between the slot and the middle line, but equally on both sleeves. We iron. see also how to process a sleeve
- We sew cuffs. Iron and sew with decorative stitching.
- We turn the collar. We sweep, iron, sew off the flying part with a finishing line. Remove the notch and iron.
- Sweep and stitch the collar. Depending on the processing of the bead, there will be different ways to connect the collar to the shirt.
- There are finishing lines on the sides, if provided, as well as loops, buttons and finishing ironing.
Download this pattern pdf:
A simple pattern of a shirt blouse with offset side seams
$1.70 (68 hryvnia)
Bank cards of the Russian Federation are not accepted for payment!
Size charts What is the height of the pattern Payment methods Ask a question Reviews
Vera Olkhovskaya in social networks:

See similar clothing patterns and how to sew on them


-
Any pattern for free for a review of a previously made order
More...
Lifetime promotion for buyers of patterns!

Leave a review about my store of patterns for an order that you made before, and you will receive any paid pattern of your choice Free!
Catalog:
New patterns on the site


Most readable articles
- How to print patterns in full size on sheets of any format? Category: F.A.Q.
- Pattern of a dress for a babydoll girl Category: Dress patterns for free
- How to take measurements for sewing Category: Sewing: general questions
- How to sew a skirt without darts and without a pattern: "Tatyanka" Category: How to sew...?
- How to learn to sew from scratch at home for free? Category: F.A.Q.
- Skirt with a belt - how to sew a belt to a skirt and processing the belt when sewing a skirt for beginners Category: Waist section processing with and without belt
- How to choose a pattern size? Do Olkhovskaya patterns require a fit? Category: F.A.Q.
- Do-it-yourself parsley, Cossack and Gnome according to free patterns by Vera Olkhovskaya Category: How to sew a New Year's costume and costumes for the holidays with your own hands
New lessons and reviews
-
I sewed a boho trapeze dress size 42 according to your pattern
Category: Patterns - photos and reviews from users

-
I made two dresses with this pattern.
Category: Patterns - photos and reviews from users

-
Thanks for the fast order processing.
Category: Patterns - photos and reviews from users

-
When sewing, I slightly deepened the front neck
Category: Patterns - photos and reviews from users
