 In this article I will tell you how to make a base pattern with two side tucks with my own hands, and also show some of my ready-made patterns for printing in full size of such dresses and blouses.
This base is designed specifically for full, can be used for sewing a dress or blouse with an adjacent or semi-adjacent silhouette, can be performed with or without a semi-relief.
Suitable for modeling, BUT NOT suitable for outerwear.
Ready-made dress patterns for full
 This base is more suitable for owners of a large bust with a large Sun (when the centers of the chest are located low enough, below the level of barrel height).
Before proceeding with the construction of the drawing, we perform calculations of the width of the parts and write them down in the measurement table.
Calculations for Host Parts
Back calculations:
1/2 (Cr + Pg) minus 3 cmWhere Pg = 4 cm - according to the level of the barrel;
1/2(Sat+Pb) minus 3 cmWhere Pb = 1 cm - according to the level of the hips.
Calculations for the shelf are performed with the same additions:
1/2(Sg + Pg) + 3 cm - according to the level of the armhole;
1/2(Sat + Pb) + 3 cm - according to the level of the hips.
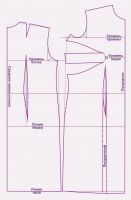
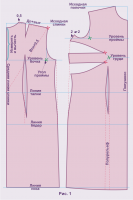
The drawing can be started both from above and from below (Fig. 1), depending on whether you are cutting on fabric or on paper.
Note for beginner cutters. You should start drawing only after you have learned how to take measurements from the figure, take them and write them down in the table of measurements.
If this is your first drawing, do it on paper first.
Experienced cutters can cut directly onto the fabric.
We start by building the back
Download ready-made dress patterns for full
But, if you are cutting on paper, step back from the bottom horizontal cut of the paper 2 см to lengthen the shelf (this is not a typo - the horizontal lines will be extended, so the indent for lengthening the shelf will come in handy), draw a straight line parallel to it - the bottom line (blue lines in Fig. 1). Lay up from her du and draw a waist line. The starting line of the back is located up from the waist line at a distance Ds.
Once again, step back up from the waist to
dB minus 2 cm
The line of the hips, as always, is located down from the waist to 18 см.
Sprout
On the original horizontal from the middle line of the back (which coincides with the vertical cut of the paper), measure
1/3Ssh + 0,5cm
Then, from the same original horizontal, go down to
1/3 sprout width
Reduce the resulting points smoothly.
Shoulder
The shoulder is built using notches made with two radii.
R1 \uXNUMXd Dp + vytwhere the tuck is 1,5 - 2 cm.
The "leg" of an imaginary compass must be placed at the lateral point of the sprout and a small arc drawn.
R2 = Vpk + 0,5 cm
Place the “compass leg” at the intersection of the horizontal waist and the vertical of the middle seam of the back, draw an arc so that it intersects with the first arc.
After that, connect the lateral point of the sprout and the point of intersection of the arcs (shoulder point).
On fig. 1, both radii are shown with a red dotted line, and the shoulder point is marked with a red cross.
We make a shoulder cut.
Lengthen the germ curve by 0,5 см, lifting up its side point and shoulder cut, build a shoulder tuck on the last one. The tuck solution is 1,5 - 2 cm, that is, as it was laid. The distance from the sprout to the tuck is 4 - 5 cm. First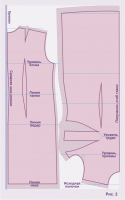 the tuck line is a vertical segment 7–8 cm long, the second line is inclined. If the lines turned out to be of different lengths, they should be leveled according to the one that is longer.
Back width at the level of the barrel to the corner of the armhole
ws + 1 cm
The width of the back at the level of the barrel along with the armhole
1/2 (Cr + Pg) minus 3 cm (the result of calculations in the table)
Armhole angle bisector - up to 4 cm.
Back width at hip level
1/2(Sat+Pb) minus 3 cm (the result of calculations in the table)
The deflection of the side seam is 1,5 - 2 cm. To build a waist tuck, divide the segment of the width of the back at the level of the barrel in half, and draw a vertical line through the resulting point.
The tuck solution is distributed evenly on both sides of the last vertical. As for the lower part of the tuck (that part of it that is located below the waist line), it is recommended to deviate its middle line towards the side seam on 0,5-1 cm.
Shelves
Extend the horizontal lines of the waist, hips and bottom. From the waist up, set aside dpt and draw the original horizontal for the shelf, and from it, measure down Wg and draw a horizontal line of length rcg. Its end point is the center of the chest.
Only one horizontal line remains - the level of the armhole, which is determined using the table to reduce the armholes of the shelves. Measure along the middle vertical of the backrest the distance from the sprout to the level of the barrel (in the drawing this segment is indicated by a curly bracket) and subtract the corresponding tabular value from it. Set the result down from the original horizontal shelf.
Note for beginners. Considering the features of a full figure, for example, a protruding chest, experienced cutters may suggest cutting a shelf on 1 - 3 cm longer than the back, and vice versa for a figure with very protruding buttocks. As mentioned earlier, with a lack of experience, or if it is possible to make at least one fitting, it is better to adjust the length of the product during the fitting. Enough to have an allowance on the bottom 4-5 cm.
Council. After correcting the product during the fitting, make, if possible, the same changes in the patterns of the base. This operation will allow you to understand how the features of a particular figure look graphically and save time when sewing subsequent products.
The width of the neck in most cases is increased in comparison with the sprout by 0,5-1 cm, especially if the product has a closure in the center or with a V-neck. So neck width
1/3Ssh + 1 or 1,5 см
Next, you should limit the shelf in width at the level of the chest and hips (the values \uXNUMXb\uXNUMXbare recorded in the table) and find the top of the armhole angle. To find the top of the armhole angle, set aside from the half-skid
Shg1 + 1 or 1,5 см,
from the obtained point, restore the perpendicular height 5 см. Now, to build an armhole, one more auxiliary point is missing, which is at a distance from the highest point of the side cut 1,5-2 cm to the right and to 2-3 cm up. Curve the armhole.
Side darts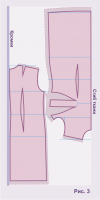 for the chest, they are built according to the same principle as a single side tuck - based on the difference in the side segments of the shelf and back from the highest point of the side seam to the level of the waist. But the tuck solution is divided into two parts and the tucks are located at a distance 3 - 5 cm one from the other.
Rule. If the difference between the side segments of the front and back from the waist to the level of the armhole exceeds 10 см, then two side bust darts will provide a better fit than one.
So, we build two side tucks on the chest. The points of the tops of the darts should be above and below the center of the bulge of the chest on 2,5 см and not reach him 2,5 см. From the tops of the tucks we draw two parallel segments to the side cut. On the side cut, we measure from these parallel segments in half of the tuck solution. Let's build the missing lines of tucks and equalize them with each other.
Rule . The lengths of the sides of the side tucks should be equalized along the upper segments, as along the longest ones.
Waist darts and deflection are calculated in the usual way:
side slope of the back 1/4 (Cr minus St) minus 0,5 cm;
thallium tart solution more than the side bevel of the back by 0,5 cm;
the bevel of the shelf is back bevel minus 0,5 or 1 cm;
solution of thalium tuck on the shelf (Cr minus St) minus (back tuck + bevels).
For women with large breasts, but without a protruding belly, adjustments in the design will be needed: instead of a waist tuck, a semi-relief of a larger solution should be made than a regular tuck. A semi-relief or an enlarged tuck is placed as close as possible to the semi-skid so as not to disturb the fit.
About the patternless cutting of a blouse or dress for full
Download ready-made patterns for full life size
The fabric is folded in half, the edges are aligned and parallel to the edge of the cutting table.
The fabric sections to your right are aligned (aligned, the angle between the edges and the sections must be straight).
The construction of the back is carried out exactly as described (see the beginning of the article), and then allowances are added to the back. To the shoulder and side cut - 1 - 1,5 cm, to the bottom - 3 - 5 cm. We do not add seam allowances to the sprout and armhole - we cut it out beyond the line.
When the back is ready, we estimate the location of the shelf, for which we measure the width of the remaining fabric, where to place the shelf.
To do this, we use the calculation of the width of the shelf
1/2(Sat + Pb) + 3 cm + seam, where Pb = 1 cm, and the width of the seam allowance is 1 - 3 cm.
From this it follows that up to the 64th size, the shelf is placed with a “jack” with a back, with a fabric width of 150 and a sum of seam allowances of 4 cm.
If the shelf fits, we mark the horizontal lines from the half-skid and build a drawing according to the description. In conclusion, we add seam allowances: along the shoulder and side cuts from 1 to 3 cm, along the bottom - 3 - 5 cm. We do not add seam allowances to the neck and armholes, but cut them out beyond the line.
Options for the location of the shelf and back for sizes from 66 are shown in fig. 3 and 4.
Let us consider the last option in more detail (Fig. 4). In this case, the fabric is folded taking into account the width of the back, and then, taking into account the width of the shelf. That is, after cutting out the back, we fold the fabric again for the shelf. This gives not only savings, but also the ability to lay the cut-out back in place of the shelf and “kill” the horizontal lines in order to speed up the construction of the drawing.
Ready-made patterns of dresses for full life-size
1. Download the ready-made dress pattern trapeze angle with an average seam, sizes from 40 to 64
Instructions and pictures are free, a ready-made pdf pattern is paid, the price is 144 rubles (2 c.u.).
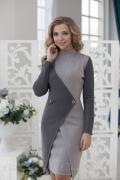
2. Download ready-made patterns of dresses in boho style for full 52 - 64
Instructions and pictures are free, a ready-made pdf pattern is paid, the price of each pattern is 108 - 144 rubles (1,5 - 2 USD).
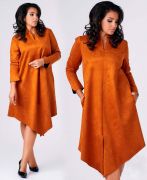
3. Download a ready-made pattern of an a-line dress "asymmetry" from a footer, sizes from 40 to 64
Instructions and pictures are free, a ready-made pdf pattern is paid, the price is 144 rubles (2 c.u.).
Instructions and pictures are free, a ready-made pdf pattern is paid, the price is 122,4 rubles (1,70 c.u.).
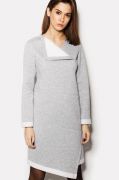
5. Download the finished pattern dress-shirt cut-off length difference sizes from 40 to 64
Instructions and pictures are free, a ready-made pdf pattern is paid, the price is 122,4 rubles (1,70 c.u.).



 Join my community on Viber...


