Base with chest tuck - one of the most common special, as it is suitable for most figures and is easy to build (see the description of the construction of the base with a breast tuck).
In addition to simplicity, this base has another very important advantage: with one “light movement of the hand”, in which scissors, it can turn into a base with reliefs.
An example of such a transformation of the bodice is shown in Fig. 1: we cut the back by connecting the shoulder and waist tucks, we can cut the shelf by connecting the tops of the chest and waist tucks or close the chest tuck by transferring it to the waist tuck.
 Based on a chest tuck for dresses and outerwear transformation looks the same - the patterns are cut, connecting the tops of the patterns (Fig. 2 a).
Beginning tailors should remember that we make drawings for modeling without drawing lines.
In other words, the tucks that we will close or move do not need to be drawn with concave lines.
 Let's add the necessary bends after the modeling is finished.
Pay attention to fig. 1: The front darts are drawn with straight lines, so the chest darts close easily.
The result of this closure is shown in Fig. 2 b.
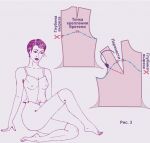
On fig. 3 shows the modeling of a top with straps.
The cutting depth of the shelf and backrest is pre-measured on the customer.
 Drawings with tucks drawn in straight lines are also used for modeling.
After the top of the back and the shelf is cut off, we proceed to the tuck.
In this case, the chest tuck is transferred to the armhole area.
 To do this, in the right place on the shelf, an incision is made to the top of the transferred tuck.
We do not cut a couple of millimeters to the corner of the top.
Then we glue the chest tuck with adhesive tape, butt-joining its sides.
 As a result (Fig. 4), the tuck opens in the right place and we draw it with smooth lines.
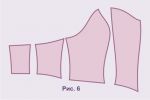
Popular corsetry products are also modeled on a basis with a chest tuck or on a basis with reliefs (Fig. 5 - 6)
When modeling corset products, it is very important to take into account the degree of tightening and measure it with the properties of the fabric.
If the fabric stretches, then the tightening may be greater than for a fabric that does not stretch.
So, having previously measured the size of the parts to be cut and the height of the corset, we draw cut lines on the patterns (Fig. 5).
Please note: the height of the cut off parts according to the measurements in total with the height of the corset according to the measurement should be equal to the height of the pattern.
Perform such a check so as not to be mistaken.
It is advisable to check the cut line above the chest with the size of the cup of your favorite bra.
Pay attention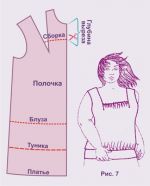 mania for the fact that the deflection of the semi-skid has been added.
This will make the chest visually more magnificent.
So, cutting off the excess, we get a result similar to that shown in Fig. 6.
Advice for beginners: it is better to make the first corset with zero tightening, that is, with zero Pg.
To do this, when calculating the drawing, instead of Pg, add zero.
If the tightening is not enough, take along the middle seam of the back.
And one more example of modeling a base with a chest tuck: a blouse, tunic, dress and nightgown in one pattern (Fig. 7).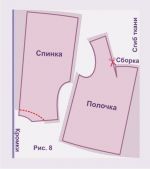
The lines of the tuck on the basis, as in the previous cases, are straight.
Straight silhouette.
These products are ideal for pregnant women, as well as donuts.
We start by measuring the depth of the cutout and drawing the assembly line (Fig. 7).
We bend the “excess” on the shelf so that when you reuse the pattern, do not stick this fragment.
measuring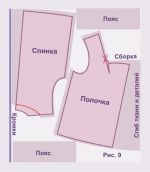 m the rest of the shoulder seam of the shelf, set aside its value along the shoulder seam of the back and draw a new sprout line (Fig. 8 - 9).
The patterns changed in this way are laid on the fabric.
On fig. 8 shows an example of a flared blouse (tunic, dress or nightgown, depending on the length of the pattern).
The extension of the silhouette is achieved due to the fact that the patterns are laid at an angle to the edge and fold of the fabric.
If there is a need to increase the assembly, the shelf is laid indented from the fold (Fig. 9).
This layout also shows the cutting of the stitched belt, as in fig. 7.

 Join my community on Viber...


